
A good trip might have quite a few maps when you’re finished planning.
The importance of map planning
You might think most of your map work would be for getting between cities and other destinations.
If you’re driving, sure; but it you’re flying or taking the train you hardly need a map at all.
The benefit of map planning is that we’ve found several cities to be much bigger than they appear on maps etc,; enough that your brain doesn’t quite grasp that two places that look close together might be two hours apart.
With all your target places in a map, you can
- group them and do some “if we’re going to X anyway and Y is right there …”
- get a general idea of what might make a day or a half-day
- figure out where your hotel should be
- work out approximate transit times from hotel to location and back
- work out how much walking might be required, and compare to your day target (this is when you might pair a walking morning with a non-walking afternoon
- see if your day/half-day plans are feasible
- balance what you want to see with how much energy you have to spend
We also make lots of small. focused maps for specific sub-trips. That unclutters the bigger maps, and lets you be really specific with things like walking routes.
Which one?
I use Google maps, for reasons you’ll see below. But you may want to try Apple Maps (on the web or as an app) for one thing. They are creating outdoor and indoor maps of major airports and shopping centres. As of 2021, Toronto Pearson (for example) offers a map and more for each of: restrooms, terminals, check-ins, gates, bag claims, food, drinks, shops. You can click an icon to show the detail you want. On the map you may also see “Look inside”: that gives you what the other guys call “strreet view.”
Google regular maps
The map system you’re probably used to: maps.google.com
If you’re logged into Google already it’s one of the options under your little nine-dot icon at the top right.
You’ll use this for
- orientation
- finding specific places and seeing what else is nearby
- finding the options for getting between places, and all the details thereof [more on that later]
- routefinding via Street View
- and much more.
Pro tip (you’ll need this for sights and hotels and restaurants): The address is shown on the right. It can be handy two ways:
- if you look the place up on Google Maps and can’t find it; usually this is because it’s listed with a weird form of its name. Just look for the address, and the map will show you what is obviously the place.
- If you’re in a country with a different alphabet, copy-paste the address in that alphabet into your plans; then, in a pinch, you can show it to people.
Currency tip: If you’re logged in to Google, you can change the currency shown in search results. In a map, click the three lines at the very top left. Scroll WAY down that list to “Region Settings” and choose one. If you’re looking at Rome, maybe choose Italy to get Euros or your home country to get its currency. At the bottom of the page, click Save. Your map will be reset, but thereafter you will show the desired currency until you change it again.
Google My Maps
Google My Maps lets you create personal maps, as many as you want, autosaved.
This is your power planning tool.
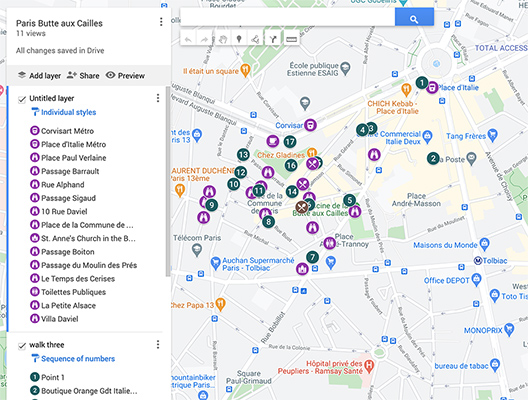
In Paris recently, for example, I created an overall map of the city, another for the area around our hotel, and a third for the Butte-aux-Cailles area (see below)
Open or create a My Maps
For this part, you’ll need a Google account if you don’t have one already. It’s free and easy.
Log in.
Open a regular Google map:
- method 1: from your browser just enter, for example, “Google map Rome” and click enter. Select from the results.
- method 2: from google.ca or google.com, click on the grid of nine dots next to your profile picture. Click on Maps. A map will appear, probably of where you are.
On the map:
- Go to the search box at top left, and click the three-stripes icon at the left of the box.
- Scroll down a bit and click on “Your places.”
- At the top of the resulting list, choose MAPS.
If you have maps already, they’ll be listed here.
NOTE: if you choose an existing map, as soon as you open it click on “Open in My Maps”
Either way, there will be a Create Map link at the bottom of the list. It will put you into My Maps ready to start a new one.
Learn by making a test map
Open a regular map in one browser window. Two options:
- Search for the place you want in Google, and click on one of the maps you are offered.
- If you’re signed in to Google, go to the top right, click the box of nine dots, and then click the Maps icon. You’ll get a local map.
- At the left side of the map’s search box, click the three stacked lines.
In the resulting list select “Your Places.”
Then select the MAPS tab.
Now start a new My Map.
- As above, click “CREATE MAP” at the bottom.
Click on “Untitled map” and give it a title.
Then click on “Untitled layer” and give that a title. Maybe just “main” for starters, you can change it later.
Look around for places to click on, or type something in the search box.
Search tip: can’t find an obvious place? Its name may be in the local language. Good luck.
Now. start marking key places – your hotel and sightseeing highlights, and maybe some specific restaurants. If you want to put on on the map, select it then click “add to map.”
“Add to map” opens a new panel, where you can:
- There may be a website address; copy that into your Word document or equivalent.
- If you click on the pencil, you can edit the title of the item.
- If you click on the leftmost icon, a tilted square, you can choose an icon and a colour. Explore this for a while. You may want to use one colour for must-see and another for maybe; or one colour for Monday , another for Tuesday, …
Get a bunch of them saved, then go to “My Places” and open the map for some cleanup. Double-click each marker to open its window. You can modify the text, add a note, and especially change the marker icon so it indicates what kind of thing it represents.
You can drag your entries up and down the list, putting them in alphabetical order or some kind of natural grouping.
The reason for doing this is to get a feel for which things are near each other. This lets you decide which things make sense to do in the same outing, and reminds you that if you are going to A and B, you might as well see C because it’s right on your way.
NOTE for iPad users: The Maps feature on iPad may take over whenever you try to do this. It is not nearly as useful. Do your heavy planning on a full computer. This advice may be outdated, depending on your device and operating system level.
Read more about Google My Maps from Google’s own pages.
Pins
You can also change the pins to numbered ones to show your day in order.
Under the name of each layer in the left sidebar, click on “Individual styles” and see what the other options do to your pins.
Layers
You can have multiple layers in a map. I recommend this, because you rarely need to have all the icons showing. I usually have the sights and key places on the main layers, restaurants on another, and transit on a third. You might have a fourth layer for “maybe” sights that haven’t been set in the plan yet.
You can show or hide each layer; so for one task you might hide restaurants, for another you might hide transit, and so on.
Walking routes
Detailed planning of a walk helps you set up trip segments that are a suitable length for your group. You can figure out when to take a break, check your other maps to find a place for a break, and so on. Or you might have agreed on a daily maximum distance. You can also compare alternative routes for distance, and check the amount of up-and-down in your planned route (maybe you can go around the hill instead of over, or arrive on the other side of the hill).
I use two tools for planning a walk.
Google Maps is quick and general, and GMap Pedometer lets you get VERY specific.
Plan a walk on Google maps
If you just ask Google for directions between start and end points, and maybe a couple in between, then choose the Walking option, you will get a decent route suggested. It will also tell you what kind of hills you’ll face.

Plan a walk on GMap pedometer
Many sites have the pedometer embedded, so you could just do a Google search for “Google pedometer.” But a plain version is available at https://www.mappedometer.com Or you might prefer http://www.gmap-pedometer.com/
Play with it for a while and you’ll soon see how it works. Once you have a route you’re happy with, Save it. You’ll get a unique URL that you can put into your planning documents and bookmarks.
